There are some recipes that just feel like magic in the kitchen, and this buttery roasted garlic aioli is one of them.
It’s the kind of sauce that transforms even the simplest snack into something crave-worthy and memorable.
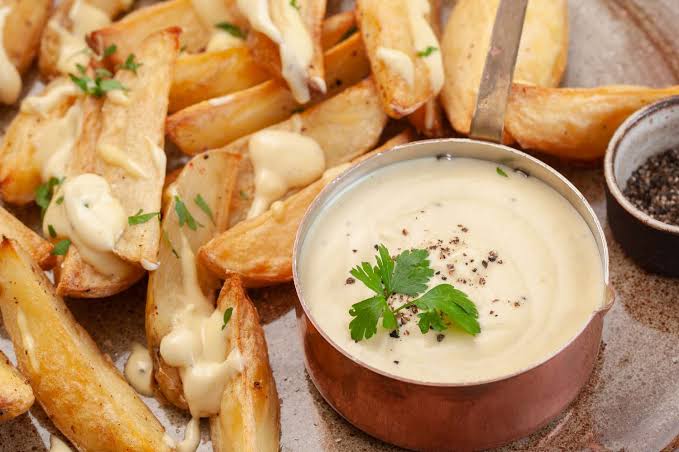
Picture this: crispy fries dunked into a creamy, golden aioli that’s been kissed with the sweetness of roasted garlic and enriched with the richness of butter.
It’s indulgent, it’s comforting, and it’s the kind of thing you’ll want to keep in your fridge at all times.
What I love most about this recipe is how versatile it is. It’s not just a dipping sauce for fries (although it’s absolutely killer with fries).
It can be slathered on a juicy burger, drizzled over roasted veggies, or even used as the secret star of a sandwich spread.
If you’ve ever had a plain turkey sandwich and wished for a little magic, this aioli will deliver in spades.
Another reason I’m obsessed with this recipe is how easy it is to make.
Sure, the roasted garlic takes a little bit of time in the oven, but it’s mostly hands-off, and the aroma that fills your kitchen while the garlic caramelizes is reason enough to do it.
Once you whip everything together, you’ll have a homemade condiment that rivals anything you could buy in a store, except this one is fresher, creamier, and made with ingredients you can actually pronounce.
I promise you, once you try this buttery roasted garlic aioli, you’ll be looking for excuses to drizzle, spread, and dunk it into every meal.
What is a Buttery Roasted Garlic Aioli Recipe?
Table of Contents
Let’s break it down: aioli is a creamy Mediterranean sauce that traditionally comes from the southern regions of France and Spain.
It’s basically an emulsified blend of garlic, oil, and sometimes egg, creating a rich and silky condiment that’s like mayonnaise’s more sophisticated cousin.
But in my kitchen, I like to put a little twist on the traditional by adding roasted garlic (because that mellow, caramelized sweetness is unbeatable) and, of course, butter for that irresistible depth and richness.
So what exactly makes this recipe stand out? It’s the marriage of the classic silky aioli base with the nuttiness of roasted garlic and the luxurious finish of melted butter.
While traditional aioli can sometimes lean sharp and garlicky, roasting the garlic mellows it out, giving it a natural sweetness that balances beautifully with the creaminess.
Adding butter takes it a step further, making the texture velvety and the flavor downright addictive.
Think of this aioli as a hybrid between garlic butter and mayonnaise, two condiments we already love, now married into one.
It’s like dipping your fries into garlic butter but with the smoothness of a creamy sauce that actually clings. It’s like spreading butter on bread, but elevated with garlic’s savory personality.
This aioli is the perfect example of how a simple kitchen experiment can create something extraordinary.
Once you taste it, you’ll wonder how you ever lived without it.
Key Ingredients
The beauty of this recipe is that it doesn’t ask for anything fussy, just a handful of humble ingredients that, when combined, become something so special.
Here’s what you’ll need:
Garlic: The star of the show. Roasting transforms raw garlic’s sharp bite into something soft, mellow, and slightly sweet. It’s the flavor foundation for this aioli.
Butter: Unsalted is best so you can control the seasoning. The butter melts into the aioli, giving it richness and a silky mouthfeel that sets it apart from plain mayonnaise.
Egg Yolk: This is the emulsifier, the magic ingredient that binds the oil and butter into a smooth, creamy sauce. Fresh eggs are always best here.
Olive Oil: A good-quality olive oil adds fruity depth and helps create the classic aioli texture. You can also blend in a neutral oil like canola if you want a milder taste.
Lemon Juice: A squeeze of fresh lemon brightens the sauce, cutting through the richness and giving it just the right zing.
Salt: Because every good recipe needs seasoning to bring the flavors into balance.
One of my favorite things about these ingredients is how they transform when combined.
On their own, they’re simple and everyday, garlic, butter, oil, eggs, lemon, but when you whisk them together, they become this dreamy, golden spread that feels gourmet.
And the best part? You probably already have most of these in your kitchen, which makes whipping up a batch of buttery roasted garlic aioli an easy weeknight treat.
Step-by-Step Instructions
Making buttery roasted garlic aioli at home is easier than you might think.
The only “hard” part is waiting for the garlic to roast because the smell alone will have you hovering around the oven in anticipation.
But trust me, this part is so worth it.
First, you’ll start by roasting the garlic. Take a whole bulb, slice off the top to expose the cloves, drizzle it with olive oil, wrap it in foil, and let it roast in the oven until the cloves turn golden, soft, and caramelized.
This usually takes about 40 minutes at 400°F (200°C). Once roasted, let it cool slightly before squeezing out the buttery-soft cloves.
They should almost spread like paste, that’s when you know they’re perfect.
Next comes the base. In a mixing bowl (or food processor if you like things easy), whisk together an egg yolk, a teaspoon of lemon juice, and a pinch of salt.
Slowly drizzle in olive oil while whisking continuously, allowing the mixture to emulsify into a thick, creamy sauce.
This is the heart of aioli, it’s all about the slow incorporation of oil into egg yolk so that it turns silky instead of splitting.
Once your base is ready, stir in the roasted garlic and melted butter. The butter should be slightly cooled but still liquid.
Whisk until smooth and glossy. Taste and adjust with more salt or lemon juice if needed.
At this point, you’ll want to grab a spoon, take a taste, and probably do a little happy dance in your kitchen, it’s that good.
Variations and Substitutions
This recipe is wonderfully adaptable, which makes it fun to experiment with depending on what’s in your pantry or what you’re craving.
If you want to dial up the richness, you can add a splash of heavy cream or even replace part of the olive oil with more butter.
If you’d prefer something lighter, substitute half the olive oil with a neutral oil like avocado or grapeseed to mellow out the flavor.
Not a fan of raw egg yolks? You can cheat a little by using good-quality mayonnaise as your base and mixing in the roasted garlic and melted butter.
It won’t have the exact same depth as a traditional aioli, but it’s still incredibly delicious and comes together in a flash.
Want to give your aioli some flair? Add herbs like chopped parsley, dill, or basil for a fresh twist. Or stir in a pinch of smoked paprika or chili flakes for a spicy kick.
I once added a little Parmesan cheese, and it turned into this savory, cheesy garlic butter spread that was absolutely divine.
The garlic itself can also be swapped around, try roasting shallots or even caramelized onions for a slightly different spin.
The beauty of aioli is that it’s endlessly customizable. You can make it your signature condiment with just a few small tweaks.
Meal Ideas to Try
This buttery roasted garlic aioli is not just a condiment; it’s a kitchen secret weapon. Once you have a jar ready, the meal possibilities are endless.
One of my favorite pairings is with crispy roasted potatoes or sweet potato fries. The creamy, garlicky sauce clings to the edges perfectly, making every bite heavenly.
Burgers also get an instant upgrade when you swap out ketchup or mayo for a dollop of this aioli, it adds so much depth and richness that you’ll wonder how you ever ate burgers without it.
Sandwiches and wraps also benefit from a spread of this aioli. Try it in a simple BLT, and suddenly you have a gourmet lunch.
It also works beautifully with grilled chicken or roasted turkey, giving lean proteins a boost of flavor.
But here’s my secret: toss a spoonful into hot pasta with a sprinkle of Parmesan, and you’ll have the most comforting, garlicky butter sauce in minutes.
It’s not traditional, but it’s ridiculously good.
Seafood lovers will also find this aioli to be a dream companion. Shrimp, salmon, or even crab cakes taste elevated with just a dab on the side.
And if you’re a veggie enthusiast, roasted broccoli, carrots, or asparagus dipped in this golden sauce will win you over.
Once you start experimenting, you’ll find this aioli sneaking its way into almost every meal.
Frequently Asked Questions
Can I Make this Aioli Ahead of Time?
Absolutely! It keeps well in the fridge for up to 4 days. Just store it in a sealed jar and give it a quick stir before using.
Do I Have to Use Raw Egg Yolk?
If you’re not comfortable with raw egg, use pasteurized eggs or substitute with mayonnaise as the base. The flavor will still be delicious.
Can I Freeze Garlic Aioli?
I don’t recommend freezing it because the texture can separate once thawed. It’s best enjoyed fresh or within a few days of making it.
What if My Aioli Breaks or Separates?
Don’t panic! Just whisk in a teaspoon of warm water or another egg yolk slowly to bring it back together.
Is There a Vegan Option?
Yes! Use vegan mayo as your base, stir in the roasted garlic and melted plant-based butter, and you’ll have a vegan-friendly version that’s just as tasty.
Buttery Roasted Garlic Aioli Recipe Card
Ingredients
- 1 whole head of garlic
- 1 teaspoon olive oil (for roasting garlic)
- 1 egg yolk (or 2 tablespoons mayonnaise if substituting)
- 1 teaspoon fresh lemon juice
- ½ cup olive oil (or half olive oil + half neutral oil)
- 3 tablespoons unsalted butter, melted and cooled
- Pinch of salt, to taste
Instructions
- Preheat the oven to 400°F (200°C). Slice the top off the garlic head, drizzle with olive oil, wrap in foil, and roast for 40 minutes until cloves are soft and golden. Let cool slightly.
- Squeeze the roasted garlic cloves into a bowl and mash into a paste.
- In another bowl, whisk together the egg yolk, lemon juice, and salt.
- Slowly drizzle in olive oil while whisking continuously until thick and creamy.
- Stir in the roasted garlic paste and melted butter until smooth and glossy.
- Taste and adjust seasoning with more salt or lemon juice.
- Store in a jar in the fridge for up to 4 days.